|
Disk brakes use two metal-backed pads held in place by magnets. There may
also be a spring-loaded clip that keeps the pads in place. Pistons push the pads
against a metal rotor. Activation may be hydraulic, or with a standard brake
cable. If you have mechanical disk brakes (activated with
a cable), click here. If you have a hydraulic
system without pad adjustment knobs (such as Hayes), click here.
Proper function of the brake depends on (1) the rotor must be straight and
smooth, (2) the caliper mechanism must be properly aligned with the rotor, (3)
the pads must be positioned correctly, (4) there must be enough "pad"
left, and (5) the lever mechanism must push the pads tightly against the rotor,
with "lever" to spare.
 |
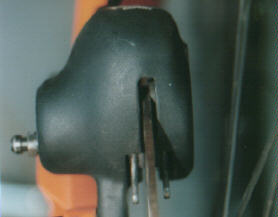
To adjust the brake pads to compensate for wear (for example, when the
brake lever is starting to come close to the handlebar), find the pad position adjuster.
On the Coda brake pictured, the outer-side pad is moved inward by rotating the disk containing the
oil valve with a hex wrench. Adjusting the closeness of the
brake pad to the disk. |
 |
There's a similar disk on the opposite side -- a bit harder to get to because
of the spokes. Adjust both pads inward, with the WHEEL side a bit closer to the
rotor. Spin the wheel to be sure the pads don't rub, and grasp the brake lever a
few times. If the rotor moves sideways (towards the spokes) at all, you need to
move the wheel-side pad inward (towards the rotor).
Adjustment of the inner pad may
require a more compact tool. |
 |
If it's time to replace the brake pads and clean the mechanism, remove the
wheel from the dropouts. This should allow you to access the pads. |
If you have a Lefty shock, you can't remove the wheel
easily. Instead, carefully remove the hydraulic cylinder from the frame. Be sure you're working
in an area where you won't drop the tiny spacing shims into the grass.
Removing the braking system from the disk. |

|
| The thin washers between the frame and the cylinder are spacing shims.
Don't lose them, and be sure you get the correct number back on the bike. Lift the cylinder assembly clear of the disk. Take
care not to lose or damage the spacing shims. |

|
 |
Now remove the old brake
pads. On the Coda brake, this is done by grasping the handle of the brake pad. Push inward
towards the slot, then slide the pad back, out toward your hand. Clean the interior of
the brake mechanism with a Q-tip, removing all dirt, sand, and oil.
Removing the brake pad. |
 |
Now slide the new pads into the slot, metal side out, pad side in. Sliding the replacement pad into position. |
|
Dial the brake pad position adjusters (both inside and
outside) to bring the brake pads apart. Now
slide the brake mechanism over the rotor and bolt it into position, being careful to
replace all the shims. Now again adjust the brake pad position until you see both pads
begin to approach the rotor, when sighting along the rotor into the brake mechanism.
Adjusting the closeness of the brake pad to the disk. |
 |
Adjust the brake lever so you have about 1-1/2 inches of space between the
lever and the handlebar when the brake is pulled. (You adjust this at the brake mechanism
itself, by turning the pad position adjustment disk on the side of the brake as above.) Test the brake lever for the right amount of "pull"
for your hand. Adjust this, not at the lever like ordinary brakes, but at the wheel, using
the adjustment disk to move the pads towards or away from the disk. |
 |
If you like the brake lever to be closer to the handlebar at rest (a
closer starting position), locate and turn the adjusting screw. On this brake, the
adjusting screw is recessed in a hole in the brake lever itself. Adjusting
the starting position of the brake lever. |
[Fix-it Index Page]
|