|
Disk Brake Rotor Repair
 |
In general, if there's something noticeably wrong with the rotor, you
should replace it. That means if it's seriously worn, gouged, or bent,
you're better off with a new one. You can, however, straighten a
slightly-warped rotor.
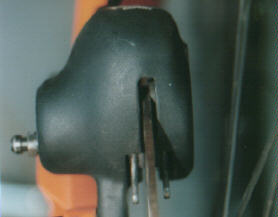
To inspect the rotor, sight straight along the pads of the disk brake
mechanism. Slowly spin the wheel while you watch the rotor.
Sighting along the rotor while turning the
wheel. |
Straightening a warped rotor:
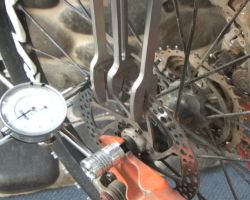
The right way to true a rotor is with special tools. If you're an
upper-level rider who demands precise performance from your bike, you can
buy a truing gauge and drumstix. This set is from MTP (Morningstar Tooling
Products). Click here for the precision rotor
truing page.Straightening a rotor
to within a paper-width of perfect. |
|
| Now here's the on-the-cheap way to do it. Put
the bike in a workstand and spin the wheel. Watch for side-to-side motion
of the rotor compared to the brake pads.
Identify the warped area. Find the spot where the rotor most closely approaches
one pad and
mark it.
Marking where the rotor is most
"untrue." |

|
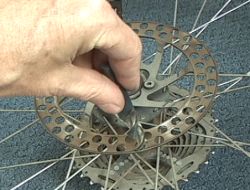
| Rotate the wheel so the "too close" spot comes
away from the brake cylinder and pads.
Clamp the disc in an adjustable open-end wrench. Tweak gently away from
the direction of the warp, then
rotate the wheel and watch for wobble. Continue gentle bending until the
warp is minimized.
Gently bending the rotor outward to
correct warp. |

|
 |
Fixing "ringing rotor" noise:
If you're getting a loud "honk" tone sometimes as you apply the
brakes lightly, some mechanics recommend that you smooth the edges of the
holes on your rotor. (This also keeps the sharp edges from
"cheese-grating" your brake pads, so the pads last longer.)
Beveling the rotor-hole edges reduces vibration of the rotor, preventing
the ugly musical tone that can occur when you apply the brakes lightly. |
| You can use a rose-head countersink bit with a drill. But I
think a nice sharp 1/2" drill bit does the job nicely by hand. A
couple of twists for each hole and the edges are smooth, without the risk
that you'll drill right through the rotor. |
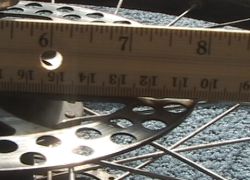 |
When to replace the rotor:
Check the rotor for concavity. This means that the gripping surface of the
rotor has been eroded a significant amount away from the former surface. A
concave rotor loses braking power, and becomes hard to get out of (and
back into) the calipers when you're removing the wheel. |
| Place a ruler edge-on over the rotor. If you see more than
a whisker of daylight, it's time to replace the rotor. Usually by this
time, you can actually feel the depression when you run your fingers over
the surface.
Also replace a rotor that has any stress-marks, dings that can't be
filed smooth, bends that can't be restored completely, or a bend that
shows any sign of a "fold-line." |
 |
Removing a damaged rotor:
To remove a damaged rotor, remove the wheel from the
bike. Using a hex-wrench, remove the retaining
bolts from the rotor.
Removing the rotor.
|
 |
With the rotor off the wheel, you may be able to straighten
the rotor further. You may also be able to grind out a ding.
Ideally, you should replace the rotor with a new one. Note the direction of the support struts
on the rotor -- they point INTO the brake mechanism in the direction the
wheel will rotate. Be sure you put the rotor back correctly, and use a
bolt-locking compound ("Loctite") on the bolts.
Be sure the struts on the disc point
into the brake as the wheel rotates forward. |
[Fix-it Index Page]
|


